


Repairs Using fibreglass: A Guide
Fibreglass is an incredibly useful material for projects requiring a quick, durable and seamless form of surface repair. Classic examples include repairs to surface structures that have become damaged (impact, abrasion, puncture, etc.) and prone to leaking and water ingress. Fibreglass repair kits are an excellent way to repair damaged structures.
Is fibreglass the right repair material?
Repairs with fibreglass require some consideration prior to usage. Key questions to be asked in advance is whether the existing surface is (1) compatible with fibreglass and (2) is in good enough structural condition to make a repair. A more detailed system adapted from the aerospace industry is detailed below and provides a decision tree to assess the feasibility of a fibreglass repair.
 Fibreglass (GRP) Repair Kit
 Fibreglass (GRP) Repair Kit
Versatile fibreglass repair kit available in a range of sizes
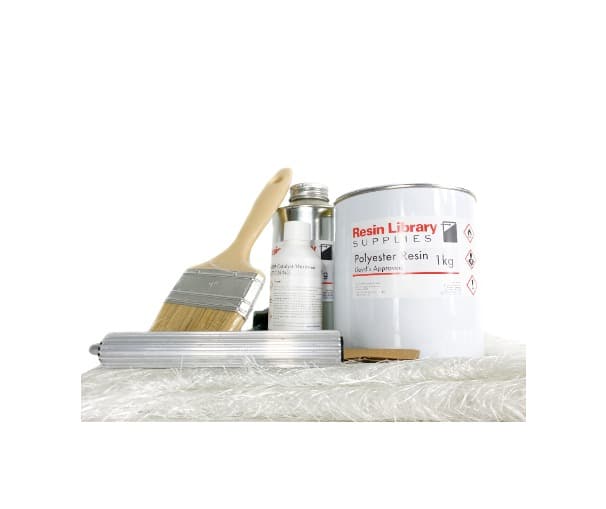
Preparation to make sure the existing surface is in good condition is important, particularly if the original structure is a flat roof, a boat hull, a kayak or a surfboard and is likely to suffer from damp and excessive moisture.
Surfaces that can be repaired or refurbished with fibreglass (GRP) linings:
- Wood: plywood*, timber decking (e.g flat roofs), etc.
- Concrete*: walls and floors (e.g. shower and wet rooms), gutters
- Fibreglass/GRP: internal and external surfaces (e.g. boat hulls, canoes, fibreglass flat roofs, chemical bunds, water storage tanks, as well as pond linings and water features).
Note: the asterisk (*) denotes surfaces where a resin primer is recommended in advance.
In terms of structural considerations, users should determine the extent of any water damage that may have occurred to the existing structure. In the case of a flat roof, has the structural decking become damaged or the insulation suffered from water ingress? In these instances, a repair is not recommended and more in-depth work and possible replacement is required.
Repair Options
When a fibreglass structure sustains damage, there are three levels of repair options available.
| Type of Repair | |||
|---|---|---|---|
| Cosmetic Repair | Inspection determines damage does not impact structural integrity. | Cosmetic repair performed to protect and restore surface for aesthetic purposes. | Does not utilise reinforcing materials. |
| Temporary Repair | Small areas of damage are detected (e.g. minor punctures or cracks). these do not affect mechanical properties of component. However, unattended to they will lead to water ingress and fatigue. | Simple patch repairs performed to protect the component until a full or more thorough repair can be made. | Utilises both matrix phase (resin) and reinforcing phase (matting) to implement repair. |
| Structural Repair | Damage has compromises structure through fracture, delamination. | Repair will involve replacement of damaged reinforcement to restore mechanical properties. | Structural repair schemes usually employ extra reinforcement to be provided in the repair area. |
Structural Repair Strategies
Most repair strategies are intended to tolerate applied loads, transmitting applied stresses across the repair section.
As such, the repair materials should overlap and also be strongly bonded to the original laminate. There are three basic approaches to this.
| Types | Description | Advantages | Disadvantages |
|---|---|---|---|
| Patch Repair | The thickness of the original fibreglass laminate is filled with reinforcement and the repair materials are bonded to the surface of the laminate via a resin and primer combination. | Fast and simple to do with minimal preparation. | Repaired laminates are thicker and heavier versus base structure. Important to obtain correct surface preparation to maximise bonding. |
| Taper / Scarf Repair | Area around damaged area sanded to expose section laminate. One filler ply may be added to generate flatter surface. Taper is required. | Repair slightly thicker versus original. Repair ply overlaps the ply being repaired, yields a straighter + stronger finish. Good adhesion possible on newly exposed surfaces | Time consuming and a higher level of skill required to obtain viable result. |
| Step Sanded Repair | Laminate sanded down to create flat band of each layer. Yields a stepped finish whereby steps are 25-50 mm per layer. | Very difficult to acheive |
Steps on how to make repairs using fibreglass
Repairs made using fibreglass centre on structural regeneration (tensile strength, stiffness, flexural strength), impermeability (to water and chemicals) as well as aesthetics. The process for repairing a water tank, for instance, is shown below.
The method below is a simplified and can be used on most fibreglass surfaces requiring a degree of reinforcement. In short, there are 4 main types of repairs that may be made to the surface of a damaged structure. These are applicable to the majority of other repair types made using fibreglass.
A general procedure for making repairs to a damaged surface using a fibreglass repair kit is listed below.
1. Allow the site to dry out: avoid all sources of moisture, from rain to water ingress. If necessary, a moisture monitor can be purchased to quantify the moisture content inside the surface.
Note: account for the weather. Factors such as rainfall, temperature, catalyst quantity and in some cases solvent should all be accounted for. For ingredients, Applicators seeking to gain clarity should contact the manufacturer of their ingredients or check the installation instructions.
Note: practice using small quantities is also a good idea.
2. Remove loose debris: if there is debris on the surface, particularly loose fragments, it should be removed in advance. Loose debris will weaken the repair.
3. Perform surface abrasion: sandblasting, shot blasting or any other form of abrasion achieved via rough faces like sandpaper can be used to create a smooth, non-porous surface.
Note: safety is a large consideration here. Care should be taken to avoid exposure to dust and debris via inhalation (use a dust mask), eyes (wear safety goggles) and skin (sharp debris can penetrate the skin).
4. Remove excess dust and debris: once surface grinding or blasting has been performed, there is likely to be a degree of dust and debris. These should be removed to create a clean surface amenable to resin adhesion. Excess dust will block bonds forming between the resin and the surface.
Note: surface contamination is a major factor in minimising adhesion between surfaces. Care should be taken to ensure the complete removal of surface contaminants. An acetone solvent and clean cloth should be used to wipe away and clean the surface to remove excess dirt.
Optional: Apply a resin primer: a resin primer is recommended to help increase adhesion. It is also a damp sealer that facilitates the bonding of the polyester resin to the surface.
Surfaces and structures are typically damaged from impact, abrasion or environmental stressors (e.g. chemical attack or biological growth). Primary causes centre on the effect of temperature and dampness which can limit strength and reduce lifetime.
The repair of damaged surfaces outside of a manufacturing or high-value component environment (e.g. aerospace) provides an excellent lesson in understanding the conditions and variables that would impact the performance of any repairs made to yacht hulls, surfboards, flat roofs, water storage tanks and any other structures amenable to fibreglass repair.
There are two main types of repairs that can be performed with fibreglass: patch repair and scarf repair. Scarf repair joints necessitate the removal of a large amount of the parent material – a feature preferable for thicker structures. Conversely, patch repairs are external, cheaper and simpler, rendering the surface in a usable condition relatively quickly. Whilst much research has gone into the optimisation of composite repair patches and patch configurations, the process is still highly dependent on the unpredictability of external environmental conditions (e.g. rain, humidity, wind, etc.).
A majority of fibreglass repair systems are implemented outside of a controlled environment – i.e., they are cured-in-place (CIP). This means that the external environment (humidity, temperature, etc) adds additional complexity when compared to those used in manufacturing. Whilst many of the aforementioned applications mirror this and do not necessarily require such a high level of control, such factors should be considered when performing repairs using fibreglass.
Bonded sections between the main structure and the fibreglass repair is the most important part based on strength and durability. Indeed, there has been much research on the impact of environmental conditions by adjusting adhesives, patch materials and geometry and curing temperature. Once repairs have been made, the main goal then is to provide a degree of confidence in the repairs for long-term performance. According to a technical review into composite repairs, it was found that moisture and temperature were highly influential to composite repair longevity beyond composite repair design. Beyond that, extended drying times were shown to improve bond strength and fracture toughness. Whilst a small amount of pre-bond moisture has little or no impact on joint repair, an increase – particularly above 1.3% – leads to a 20% loss in tensile strength, although the flexural strength was not affected.
5. Prepare the glass fibre mat (aka chopped strand mat – CSM): Once the primer has (or before) been applied, the chopped strand mat (CSM) also known as glass fibre matting should be cut and sized to dimensions that exceed the existing area to be repaired by around 10 %.
6. Mix the resin ingredients: Careful mixing is needed to achieve: (1) correct ingredients and (2) sufficient mixing without air. This is generally easier for small patches or scales of repairs but would require larger quantities for larger ones.
Note: take care not to introduce too many air bubbles during mixing. Whilst the catalyst-resin mixture needs to be homogeneous, air bubbles can lead to structural defects in the resultant composite.
Note: manufacturer’s instructions should be closely followed to ensure that the correct conditions are used. Certain manufacturers offer marginally different resins and catalysts than others. Manuals are also available to guide applicators.
Note: a good indicator of an incorrectly applied or prepared resin topcoat is excessive tackiness.
7. Laminating – apply catalysed polyester resin to the glass fibre mat: Once the glass fibre has been applied, a foam roller should be used to disperse and drive the resin into the mat. Thereafter, a paddle roller should be used to consolidate the laminate, refining the laminated surface and forcing air bubbles out. This is important since air pockets create structural weaknesses in the composite – a major cause of defects.
Note: this step should be performed when the weather is dry; water and even low levels of moisture interfere with the curing process. If in doubt, it is better to wait until there is a dry spell.
8. Allow time to cure: once the laminate has been consolidated, allow it to harden or ‘cure’. This allows time for the resin to ‘crosslink’ and create a strong structure.
Recommended time: 12 hours (winter) and 6 hours (summer).
9. Sanding down: for aesthetic purposes, it may be desirable to scale back any uneven regions of the laminate back. If so, sandpaper is recommended and machine-based sanding may be a preference.
Note: if this step has been performed, please take care to remove dust and excess debris from the surface as this will interfere with the bonding process of an outer layer.
10. Topcoat preparation: once the laminate has hardened, prepare the topcoat.
Note: the topcoat should be the same colour as the underlying surface you are intending to repair. This means you should pre-select and in some cases test the colour in the resin mixture to ensure it is consistent – purely for aesthetic reasons.
This involves mixing the topcoat resin with a catalyst using a similar process to that used for the polyester resin. The topcoat itself should be the same colour as the surface which it is being repaired.
11. Apply topcoat: Once mixed, apply a single layer of topcoat resin; avoid applying too much as this will create a brittle outer surface. At the same time, ensure there is an adequate amount of resin to cover the laminate.
Note: refer to the manufacturer’s instructions for the amount of topcoat per unit surface area of CSM used.
12. Allow time to cure: once the topcoat has been applied, provide adequate time for it to cure.
Recommended time: 12 hours (winter) and 6 hours (summer).
Note: the topcoat should transition from a tacky layer to one that is hard and smooth. If it is still tacky and sticky after 24 hours, which indicates incomplete curing. At the same time, the glass fibres should not be exposed on the surface as this will allow moisture inside and subsequent fracturing of the laminate.
Why do fibreglass repairs fail?
3 of the most common reasons for a fibreglass repair failing centre on the following:
- Incorrect materials preparation: incorrect mixing, incorrect ratios, too little catalyst, too much solvent, etc.
- Incorrect materials application: this centres on the use of too much or too little resin, delayed application (allowing premature resin curing), ineffective application due to incorrect tool (and tool technique) usage
- Wet surfaces: the surface has not dried properly, so it is likely to gradually release moisture – a common with concrete; freshly laid concrete is susceptible to slow moisture release that is not immediately evident yet will compromise polyester resin curing.
The amount of catalyst added to polyester resin can depend on the temperature; if too little is added during colder conditions, then curing can take significantly longer.
How are composite repairs evaluated?
Once a repair has been made, an assessment of its condition is often necessary. For many projects, a visual assessment is a useful way to assess the quality of a repair made using fibreglass. This can generally involve a post-curing inspection of the laminate to look for:
Pinholes
Pinholes in fibreglass are usually a sign that an insufficient amount of polyester resin has been used in the laminating part of the process. This means that the topcoat (flowcoat) resin is able to enter into the small pockets inside the laminate, giving the impression of pinholes. This can be rectified by applying a new layer of topcoat (flowcoat) resin in most cases.
Note: in some instances, water may have entered into the underlying laminate a full replacement may be required.

In this example, no water had penetrated the laminate. However, cleaning with acetone was applied to remove excess dirt and promote resin adhesion. A standard grey resin topcoat (flowcoat) was chosen and was applied to the cleaned surface. The resin was absorbed into the pinholes and restored the smooth finish of the fibreglass structure.
Resin Topcoat
Grey resin topcoat (flowcoat) designed to be applied to glass fibre laminate.

Acetone
Acetone is an effective solvent for cleaning surfaces prior to the application of resin

Cracks
Cracks in fibreglass can occur in a variety of forms. Whilst the precise cause can range from impact to excessive stress, the overall implications are a failed laminate. In most cases, it is simple to make a fibreglass repair by reinforcing the

The example above shows a cracked fibreglass structure that had split along its edge. After a level of sanding and acetone-based cleaning, a layer of glass fibre chopped matting (600 gram) was soaked in polyester resin and applied to the existing fibreglass. It was then coated with a thin layer of polyester resin for aesthetic and abrasion-resistant properties.
Fibreglass (GRP) Repair Kit
Versatile fibreglass repair kit available in a range of sizes
Uncoated Fibres on a Fibreglass Roof
Visible fibres present on a flat roof are indicative of (1) insufficient polyester resin used during laminating, (2) insufficient laminating technique to saturate matting and/or (3) insufficient topcoat.
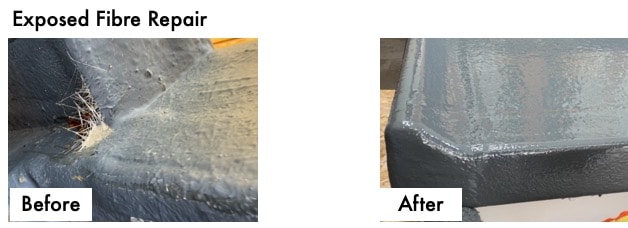
The above example shows glass fibres that are exposed to rainwater. This can lead to water ingress into the roofing structure and an eventual leak. In this case a fibreglass roof repair kit was used to re-laminate the fibres and apply a layer of topcoat.
Fibreglass Roof Repair Kit
Fibreglass roof repair kit used to repair cracks, punctures and other types of structural damage

Many of these issues can be rectified by following procedures outlined in the fibreglass repair download guide or by watching one of our repair videos. Other methods include knocking on the repaired laminate or attempting to peel it back – something which should be reserved for repairs being subjected to more demanding applications.
Where possible, a water integrity test in a controlled setting is another option for water-based structures like boats, yachts and surfboards. Likewise, fire testing of composite pipe repairs is a more investigative method used to identify safety issues around flammable liquids.
Non-Destructive Testing (NDT) and Destructive Testing (DT)
In a more advanced setting, composite repairs are usually assessed via either Destructive Testing (DT) or Non-Destructive Testing (NDT).
Non-destructive testing of composite repairs is a usual way to assess the quality of a composite repair without destroying the structure. NDT is particularly important for structures and objects subjected to high levels of mechanical stress or those which cannot be destroyed.
An overview of non-destructive composite testing techniques is detailed as follows:
- Pulsed Eddy Current (PEC)
- Radiography (RAD)
- Dynamic Response Spectroscopy (DRS)
- Guided Wave Ultrasonics (GWU)
- Laser Shearography (LS)
- Microwave (MW)
- Thermography (T)
- Phased Array Ultrasonic Testing (PAUT)
DT – destructive testing of composite materials which have been repaired are generally split into two categories: static and fatigue tests and these are detailed below.
Testing methods (static)
- Plain, Open and Filled Hole tensile and compressive tests
- E-module determination (tensile, compressive and flexural modulus)
- Bearing stress tests for fasteners
- Determination of tensile shear strength (Single Slotted Lap Shear Test SSLS)
- Flexural test on sandwich structures.
- Determination of interlaminar shear strength (ILSS)
- Fracture toughness energy (GIc- and GIIc-Test) and Mixed-Mode
- Pull Through Test
- Curved Beam Failure Load (Interlaminar Tensile Strength: ILTS)
- All testing can be performed at temperatures between -70° to +180°C
Fatigue tests
- ILTS Fatigue (Curved beam bending)
- Mode I – Interlaminar fracture toughness (GIc-Test) fatigue.
- Fatigue testing combined with non-destructive tests in order to monitor the growth of defects