


Is your fibreglass flat roof leaking? If so, read on. This article offers reasons why your roof is leaking and provides a guide on how to repair it.
This is a guest post written by Steve Bowen (managing director of Strandek)
How to Repair a Fibreglass (GRP) Flat Roof
Fibreglass is an excellent flat roofing system. Developed decades ago, it has demonstrated largely unrivalled performance. Yet sometimes poorly installed or damaged fibreglass roofing systems – particularly those approaching the end of their life may show signs of breakdown. This article provides instructions and guidance on how to make repairs to an existing fibreglass flat roof, depending on its condition.
In addition to this guide, fibreglass roof repair kits are available. These contain the materials and tools needed to make a repair of various sizes, ranging from 1 to 10 m2.
 Fibreglass (GRP) Roof Repair Kit
 Fibreglass (GRP) Roof Repair Kit
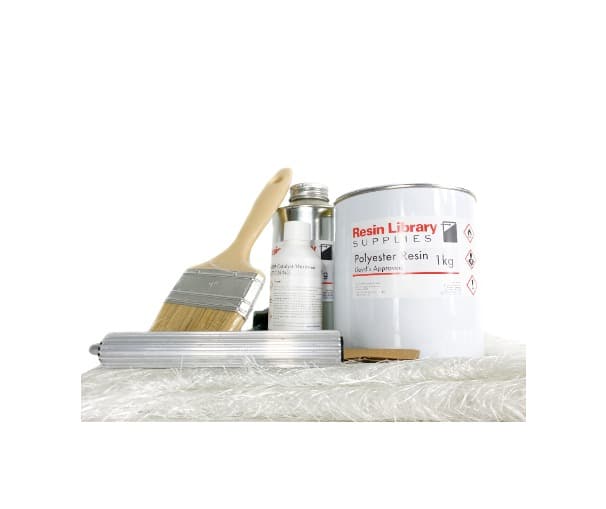
Fibreglass (GRP) roofing kits are available in a range of sizes. They include sufficient materials and tools needed to make an effective repair.

Leaking flat roofs
Leaking flat roofs are problematic in many ways. It is not always obvious that the outer roofing membrane has been breached, yet the cause of the damage by a leak can be extensive. Even a small leak can, if allowed to develop over a period of time (weeks to years), cause tremendous damage to the underlying roofing structure, from the insulation to the wooden decking and other structural aspects of the property.
So, catching the cause of a leaking flat roof early is critical. This can be achieved by inspections, maintenance programs to identify and eliminate sources of leaks before they happen via repairs, overlays and refurbishments.
Benefits of repairing a flat roof versus a replacement
There are many benefits to a new flat roof. These range from cheaper heating bills from upgraded insulation to an expected lifetime exceeding 30 years. Yet a major downside is cost, particularly if you have a limited budget or if the existing flat roof was only recently installed.
By making repairs to your flat roof – ideally pre-emptive ones – it is possible to avoid full, costly replacements and maintain the life of your roof by a decade or more.
Why is my flat roof leaking?
If your fibreglass roof is leaking, it is important to address this in advance of any repairs. The section below outlines the types of leaks, their causes and possible solutions.
Firstly, is your roof still under warranty or guarantee?
Before outlining the causes, it is worth noting that reputable flat roofers will offer a combination of insurance-backed guarantees (10 years) plus a system or workmanship guarantee (typically ranging from 10 to 20 years). Checking the timeframe is advisable to ensure your roof is still covered.
Note that these guarantees do not cover leaks caused by damage to the membrane. Rather, they cover defective materials and/or workmanship. If your roof has been punctured by falling debris, excessive foot traffic or leaking gutters, the guarantee is invalid. This is why resin-based composite systems like GRP are preferred.
TYPE: Puncture
CAUSE: Punctures typically form when excessive force is applied over a small area of a flat roofing membrane. Whilst older roofing membranes are more susceptible, newer ones like single ply (EPDM or PVC) are more prone to punctures GRP is much stronger. That said, it can puncture with concentrated impact. Standard causes include falling debris (sharp bricks, etc) or heavy/sharp equipment placement like ladders and toolboxes.
SOLUTION: Perform an inspection of the area around the apparent leak. This is advisable to evaluate the level of water ingress. In such circumstances, a core sample may be needed to identify the extent of any damage. The length of time the puncture has been damaged, its size and exposure to rainwater will dictate the extent of any water ingress. A puncture repair made using a fibreglass (GRP) repair kit can be undertaken. However, ensure that any water has been dehydrated from the underlying structure as this could cause the inner materials to mould and rot.
TYPE: Roofing membrane showing signs of wear, but not yet leaking
CAUSE: Age is typically a major factor here. Even the most durable roofing systems are susceptible to age-related breakdown. UV exposure, multiple freeze-thaw cycles that increase the size of microscopic cracks and general wear and tear all lead to a breakdown. In such instances, leaks are inevitable and the extent of damage is dependent on the time it takes to identify the leak.
SOLUTION: A full roof replacement is one option, although this is more expensive and, in some cases, unnecessary if the underlying structure is intact and no insulation upgrade is required. Instead, an over deck or overlay system is preferable. Here, the existing roof is partially scaled back to remove loose debris without removing the existing membrane. Thereafter a new layer of roof decking can be placed on top, followed by a new membrane. New insulation can also be placed on top if required. Be advised that removing the existing membrane will trigger Building regulations Part L, which would require a full roof and insulation upgrade and replacement.
TYPE: Leaks are detected in one or more regions of the flat roofing membrane
CAUSE: As above, the cause could be an age-related breakdown of the membrane or punctures.
SOLUTION: In general, a full replacement of the flat roofing insulation is required in instances where more than or equal to 25% of it is being replaced. Otherwise, options centre on a full roof replacement or an overlay/over deck system as detailed above.
TYPE: Leaking gutters
CAUSE: Sometimes the flat roof may leak due to leaking gutters. In such instances, if the gutter has been poorly designed or is overflowing due to blockages, the excess rainwater may overflow into the adjacent flat roofing structure.
SOLUTION: Leaking gutters are a major cause of leaking flat roofs. Fixing your gutters should be a number one priority, prior to making any repairs to your flat roof. See more about the causes of leaking gutters and how to stop them. It is advisable to also check the extent of any damage to the internal structure (insulation and decking). If significant water ingress has occurred, more extensive roofing work may be required.
TYPE: Poor installation
CAUSE: Incorrect installation practices cause a range of problems that ultimately result in a leaking flat roof. These can include but are not limited to: (1) poor material specification, (2) incorrect or low-quality ingredients, (3) installation during damp or wet conditions and (4) incorrect design.
SOLUTION: Ideally, damage to the roof will be repaired before the leak has spread. However, this depends on the length of time that the leak has been exposed to rainwater. In such instances, it is advisable to contact the original roofer where possible; responsible roofers will offer to make repairs and replacements and their work should be covered by an insurance-backed guarantee at a minimum. If the roof is leaking but there is no obvious sign, it is possible that the perimeter detailing is the source. This could be the lead flashing or the fact that the edge trims are exposing the roofing structure (a common cause of leaking when it rains with wind).
Examples of Leaking Flat Roofs
The following gallery is intended to show some of the leaking flat roofs encountered by Strandek. Please ‘click’ on each image for a more detailed overview of the problem and the recommended solution.


Please note that this does not represent advice and is for informational purposes only. Both Resin Library and Strandek are not liable for any outcomes. Always consult professional advice. Roofing is dangerous work.
How to repair a fibreglass roof using a fibreglass (GRP) repair kit
The following section provides a general overview on how to repair a fibreglass flat roof using a fibreglass repair kit. Such kits and more detailed instructions are available in Resin Library’s store section.
Fibreglass (GRP) Roof Repair Kit
Fibreglass (GRP) roofing kits are available in a range of sizes. They include sufficient materials and tools needed to make an effective repair.
Note: when considering any roofing work, safety should be a major factor. There are several risk factors that should be considered as part of a risk assessment. These centre on: (1) working from height, (2) manual handling, (3) asbestos awareness and (4) the use of hazardous chemicals and substances. More details on these are outlined below.
Note: Whilst fibreglass roof repair kits are versatile and suitable for a range of roofing structures. Check the surfaces that the fibreglass repair can be made to. Fibreglass bonds to plywood, timber and existing fibreglass. ensure that adequate surface preparation has been performed. A primer is strongly recommended to facilitate bonding.
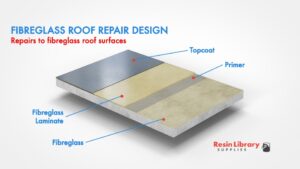
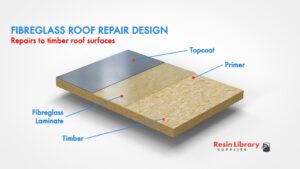

Assuming the underlying structure has been repaired and is in good physical condition, several steps should be followed:
1. Identify the source of the leak: this means locating any penetration in the existing roofing membrane. In general, if the leak is more of a puncture that’s happened recently and with little to no rain, it can be patched over – the below guidelines apply here.
Note: if multiple sections of the roof are leaking and if they have been leaking for quite a while, it usually means internal damage to the roofing sub-structures has occurred. In such a case, a full replacement is required.
Note: allow the roof to dry out. Prior to starting any work the roofing area should be dry. Damp or wet regions should be allowed to dry out.
Note: it is advisable to cover this area in a plastic cover during periods of rainfall until it can be repaired. The region should be water-tight to prevent further rainwater entry.
Note: attempts to bond the resin to a wet or damp surface should be avoided as this will limit adhesion significantly.
2. Clear the area of loose debris: roofing membrane around the repair area that is loose, contaminated or damaged should be inspected for damage and removed accordingly. Use sandpaper to scale back the membrane to create a flatter surface prior to repair.
Note: safety is a large consideration here. Care should be taken to avoid exposure to dust and debris via inhalation (use a dust mask), eyes (wear safety goggles) and skin (sharp debris can penetrate the skin). Older roofing membranes like felt can contain asbestos, especially if they were installed pre-1999, so be sure to take necessary precautions.
Note: again, consider dust protection for your eyes, skin and airways, as outlined above.
3. Apply a resin primer (optional):
Primers are designed to facilitate bonding between the substrate (e.g. existing fibreglass or plywood) and the fibreglass laminate.
Apply primer in a thin layer over the repair region. Whilst this is optional, it does enhance the adhesion of the polyester resin to the region undergoing repair.
| Porosity | Primer Coverage (kg per m2) | Tool | Note |
|---|---|---|---|
| Low Porosity | 0.25 | Polyester rollers (larger areas) or a resin brushes (smaller/complex areas) recommended. | If porosity is low, coverage should require less primer, since it will adequately cover the surfce. |
| High Porosity | >0.5 | If porosity is high, then more primer is required, since the liquid will enter into the pores. |
4. Prepare a region of chopped strand mat (CSM): size and cut the CSM. As such, 600 gram CSM is recommended, although lighter 450 g CSM is also available. Applicators should cut and size the CSM into a size that exceeds the existing surface area of the repair region by around 10 – 20 %. This is to ensure that the damaged region is repaired and fully covered.
Note: take care when cutting glass fibre mat. A stanley knife is often used, but blade-resistant gloves are recommended.
5. Apply the resin to the CSM: mix polyester resin with catalyst in a clean mixing bucket. Once mixed, use a foam roller or paintbrush saturated in catalysed resin, disperse and it into the CSM. Immediately after, apply a second, albeit smaller section of CSM for further reinforcement. Repeat the process and saturate the region in resin. Then use a paddle roller to consolidate and refine the laminate, forcing air bubbles and excess resin out.
Note: freshly catalysed resin should be used immediately. Once the catalyst has been added to the resin, it will cure and lose its malleability.
Note: ensure that the resin-catalyst mixture is carefully but fully mixed. Avoid excessive air bubbles but ensure that the catalyst has been fully dispersed into the resin. Excess air causes bubbles, which weaken the laminate.
Note: this step should be performed when the weather is dry; water and even low levels of moisture interfere with the curing process. If in doubt, it is better to wait until there is a dry spell.
6. Allow time to cure: once the laminate has consolidated, allow it to harden or ‘cure’. This allows time for the resin to ‘crosslink’ and create a strong, water-resistant structure.
Recommended time: 12 hours (winter) and 6 hours (summer). Protect the repair with adequate coverage in the event of rainfall.
7. Prepare a resin topcoat: once the laminate has hardened, prepare the topcoat. This involves mixing it with a catalyst carefully to avoid bubble formation.
Note: to match the colour of your topcoat, use a dye. BS and RAL colour schemes are available for fibreglass roofing repairs.
8. Topcoat Application
Topcoat (flowcoat) is required to provide a final waterproofing and abrasion-resistant barrier to the laminate.
To prepare the topcoat: pour a single layer of topcoat resin onto the laminated concrete surface. Take care to avoid applying too much as this will create a brittle outer surface. At the same time, ensure there is adequate resin to cover the glass fibre CSM laminate. Use a polyester laminating roller to disperse the topcoat.
| Surface Area (m2) | Topcoat Weight (kg) |
|---|---|
| 1 | 0.5 |
| 2 | 1 |
| 3 | 1.5 |
| 4 | 2.0 |
| 5 | 2.5 |
Note: refer to the manufacturer’s instructions, but a rough estimate would suggest 0.5 kg per square meter of laminate.
If you would like to purchase a repair kit without topcoat, please see our Fibreglass Repair Kits.
9. Allow time to cure: once the topcoat has been applied, provide adequate time for it to cure and harden.
Recommended time: 12 hours (winter) and 6 hours (summer). Provide adequate coverage and waterproofing in the event of rain.
Planning Permission for Flat Roof Repairs: When is it Needed?
Several regulations are relevant when considering the construction of a flat roof. These apply to fibreglass (GRP) flat roofs as well as other systems like felt, EPDM and bitumen. Some repairs to flats roofs will not require an application for approval under the Building Regulations.
What Does the Planning Portal Say?
According to the Planning Portal, repairs on a flat roof that are under 25 % will not normally need to submit a building regulations application. However, a buildings regulation application is generally required if:
+ The repaired or replacement area exceeds 25%
+ Structural alterations are required
+ The new membrane system will possess significantly different flame retardant capabilities to the existing membrane
+ Integral roofing insulation is to be replaced it would require upgrading to a better ‘thermal element’.
Understanding Building L Regulations
Compliance with Part L of the building regulations requires all roofs to be thermally insulated to a maximum U-value of 0.18 W/m²K. Note that lower U-values indicate better insulation properties. Furthermore, the flat roof thermal insulation will need to be replaced and upgraded to PIR insulation or better should the roofing repair fall under one of the four requirements outlined above.
Be advised that any changes to the roofing membrane may not solve the leak; in our experience, the cause of a leaking flat roof goes beyond the membrane.
Note: please note that Resin Library recommends a professional surveyor and is not liable for the outcome of any works undertaken here.
Health, Safety & Environment
Working on a flat roof is dangerous and care should be taken to ensure the safety of all parties involved. The UK HSE provides guidance on the following hazards associated with flat roofing work:
- Working at height
- Manual handling
- Asbestos is a major consideration in roofing – particularly on buildings installed pre-2000, where it was still used. Guidance on dealing with asbestos in roofing materials is available.
- Chemicals: polyester resin and MEKP catalyst present some degree of risk. A COSHH form should be completed in advance to ensure the risks of associated chemicals are adequately managed.
A risk assessment and that takes into account the aforementioned hazards and evaluates the likelihood of an incident occurring should be completed.
Frequently Asked Questions (FAQs)
Q. Can fibreglass be used to repair felt, polyurethane and single ply rubber (EPDM / PVC) roofing membranes?
A. Provided the existing felt has been scaled back and cleaned with acetone (after checking for asbestos), then a fibreglass repair could be used. Generally, it would be advisable to use the same material to repair the roof. However, if the repair involved the complete removal of the existing membrane, then fibreglass could be used.
Q. How much does it cost to have a professional flat roof installed?
A. A basic fibreglass flat roof installation cost is around £60 – 80 per square meter.
Q. Where can I learn more about how to install a fibreglass flat roof?
A. Resin Library offers step-by-step guides are available online for installers covering how to build a fibreglass roof from scratch. Associated kits are available, such as the 600g CSM fibreglass (GRP) flat roof kit in various sizes.
Q. Where can I learn more about fibreglass flat roofing?
A. Resin Library has a range of articles and guides relating to fibreglass flat roofing in our Knowledge Centre. Government-funded roofing apprenticeship courses are also available.
Q. How do you fix a crack in a fibreglass roof?
A. Repairs to split or cracked fibreglass require a careful and methodical approach. A guide on how to repair cracked fibreglass is also available.
Q. How is a fibreglass roofing membrane installed?
A. The standard practice for installing a fibreglass roofing membrane is shown in the video below.